Saturday, July 28, 2012

Pumpkin Spice Snickerdoodles


So whenever I get the urge to bake, but I don't feel like going out and buying things, I usually make these cookies. I usually have all the ingredients! And for the holidays I always buy Pumpkin Pie Spice but I never end up using it all! So instead of putting cinnamon in my snickerdoodles, I use Pumpkin Pie Spice! It makes the house smell like Thanksgiving and it makes for delicious cookies!

Adapted from Kelsey's Apple a Day
 
Ingredients:
3 cups all-purpose flour 
2 tsp. baking powder
 
1/2 tsp. coarse salt
 
1 cup unsalted butter, softened
 
1 1/2 cup sugar (plus extra to roll the cookies in)

2 large eggs
 
3 tsp. pumpkin pie spice (plus extra
to roll the cookies in)
A splash of milk
First, preheat oven to 350 degrees F. 

Mix together flour, baking powder, salt, and pumpkin pie spice. 


Most snickerdoodles are just sugar cookies with cinnamon sugar on top. In my mind, why not incorporate the cinnamon (or in our case pumpkin pie spice) into the mix!
 
Next, put butter and sugar in a bowl and mix on medium speed with an electric mixer until pale and fluffy, about three minutes. 


Add the eggs,


and mix until it is a beautiful canary yellow.


Reduce speed to low and slowly add the dry ingredients.


At this point, if the mixture seems too thick, you can add the splash of milk. It makes for softer cookies. 
 
In a small bowl, stir together about a third of a cup of sugar and two tablespoons of Pumpkin Pie Spice.

Shape dough into balls (you should have about 20). Roll in pumpkin pie spice/sugar and flatten. Place on cookie sheet.

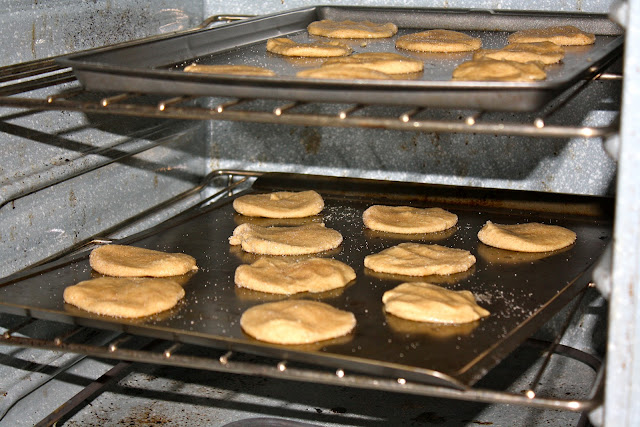
Bake cookies until edges are golden, about 12 minutes. 


Let cool and enjoy!


Sunday, July 15, 2012

Homemade Herb Bread


Homemade bread is amazing. Without a doubt. And yesterday they had fresh herbs at the farmers market at the base of campus (right next to my office!) I grabbed basil, thyme, rosemary, and sage and I knew that I wanted to bake it into some delicious bread!


To make herb bread, just take your favorite bread recipe and add your choice of herbs! This bread recipe is the one I used to make when I was a kid. I used to watch the show Zoom and they made this bread on the show and I was hooked for weeks! I was so amazed when I was still able to find it online!

Adapted from PBS Kids:

Ingredients:

1 cup white (or wheat) flour (and a little extra for kneading)
2 cups bread flour
1 cup hot water
1 package active dry yeast
3 tablespoons sugar
1 tablespoon salt
3 tablespoons vegetable oil

A splash of milk
1 gallon size resealable plastic baggie


Note: These measurements are for one loaf of bread. For the tutorial below, I doubled my recipe because I was making two types of Herb Bread.

To make Herb Bread, we are just going to add the types of seasoning we want to our bread. I made Rosemary/Thyme bread and Basil/Garlic bread but honestly you could add anything really. Even rasins and cinnamon if you want a sweeter bread, or even honey and oats for a honey oat bread!

Here are my measurements (you can just eyeball it really)

For the Rosemary/Thyme bread:

3 sprigs of rosemary leaves, loosely chopped
2 sprigs of thyme leaves

For the Basil/Garlic Bread
1/2 cup chopped basil
1 clove (2 teaspoons) of minced garlic

First, preheat your oven to 375 degrees.

Then mix 1 cup of bread flour, the packet of yeast, sugar and hot water in the sealable plastic bag.


Now get ready for the fun part. Let most of the air out of the bag, close it, and smoosh (yes, smoosh) the bag with your fingers to mix the ingredients.


My housemate Osang is a fantastic smoosher!
Then let the bag rest and watch the magic happen.


After about 10 minutes, the mixture will start to bubble and the bag will expand.


Meanwhile in a separate bowl, add the milk, the other cup of bread flour, salt, oil, and your herbs.


And mix together.


Add this mixture to your bag.


Get ready for Round 2 of Smooshing!


Open the bag and add the 1 cup of white (or wheat) flour. Reseal the bag and enjoy your last round of smooshing. Smoosh it until smooth, about one to two minutes. Then, take the dough out of the bag and knead it for another minute on a floured surface.


If your dough does not seem to be coming together while kneeding it, slowly add flour to all sides of the dough until it looks like this and it no longer sticks to your hands:


Put the finished dough into a greased loaf pan (or on a cookie sheet) and cover it loosely with plastic wrap.


Let it rise for about 30 minutes.


Then bake for
 35-40 minutes.


Slice it and serve with butter, cheese, or olive oil & balsamic vinegar!

Bon Appetite and Happy Bread Making!

Tuesday, July 10, 2012

DIY Doily T-Shirt


If you remember, a couple weeks ago I went thrifting and bought the sheet to make my DIY Bedsheet Curtains. Well I also bought this gorgeous doily!


To make this T-Shirt refashion, first get a doily like the one above and a frumpy old T-Shirt you dont care about.

See, super frumpy. So frumpy I had to squint my eyes so I wouldn't see the hideousness!

Lay out your shirt on a flat surface face down.


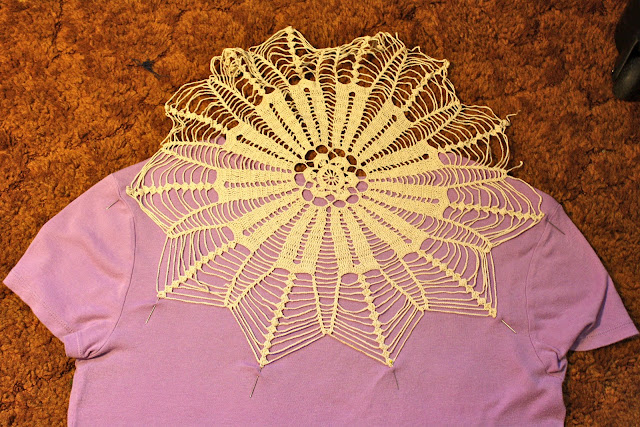
Position the doily how you want it to look and pin it in place. I pinned mine so that half of the doily would be on the backside of the shirt, but if you wanted more doily you could always do two-thirds of it.


The next step is to sew the edge of the doily onto the backside of the shirt. For this step we will leave the doily whole and just worry about sewing the backside.


Then, flip the shirt inside out and cut out the back of the t-shirt from the collar to the doily edge being careful not to cut your stitches.


Flip your shirt so that the front is facing up and fold the doily over to the front.


Position it how you want it and then pin the doily to the shirt front.


Then sew the doily to the front just like you did on the backside.


Then, cut your doily directly in half across the neck of the shirt.


Then I cut the half circle out of the front of the doily. 


These next few steps really depend on what you want your shirt to look like. I wanted some of the doily to rest on the shirt (as opposed to the backside which I cut out the entire shirt part where the doily was).


At this point I tried on the shirt to determine how much in the front I wanted to cut out. 


I decided to first cut about an inch from the edge of the neckline from one shoulder to the other.


Then I decided I liked the way the doily looked on my bare shoulders so I cut to about a half inch from the edge of the sleeves. 


I also knew I wanted a little dip in the front of the shirt so I went a little deeper directly in the center of the shirt.


And Voilà!  A less frumpy and more fashionable shirt!


My adorable nephew agrees! Happy sewing!

Thursday, July 5, 2012

Southwestern Corn


For the 4th of July (and my nephew's 4th birthday) I got to go home to The Desert (my hometown of Bermuda Dune; somewhere in between Palm Springs and Coachella). On the 4th, my family had a BBQ and I offered to make my famous Southwestern Corn. Don't tell anyone its semi-homemade!

Ingredients
1 tbsp olive oil
1/2 onion, chopped
2 tsps minced garlic
3 dashes of Hot sauce
2 small bell peppers, chopped (I like to use green and red)
2 cans of whole kernel corn, drained
1 can of diced tomatoes with green chillies, drained (Beware, the green chillies are a bit spicy!)
1 tbsp diced black olives
salt/pepper

Heat some oil in a large skillet. If you have a grill skillet, use that so you can get a nice char on your veggies.

Add the onions, garlic, hot sauce, salt and pepper and sauté until onions are almost tender.


Add the chopped peppers,


and sauté until the onions are translucent.


Scoot the onion, garlic, and pepper mixture to the outsides of the pan making a well in the center.

Add the corn to the well. This will allow the corn to have the most amount of contact with the pan and the heat.


Cook the corn in the well until it has a nice color to it, but not too tender.


Add the tomatoes and cook another couple minutes, stirring all together.


Cook, while stirring, until all the liquid is absorbed.


Lastly add the olives


And thats all there is to it! Serve it hot or cold, with chips or without!